- The main differences
- How to make a LED lamp
- Making the scheme
- How to do without soldering
- How to collect light bulbs
- Conclusion
LED driver from energy saving lamp can be easily done in an hour, if there is a desire.
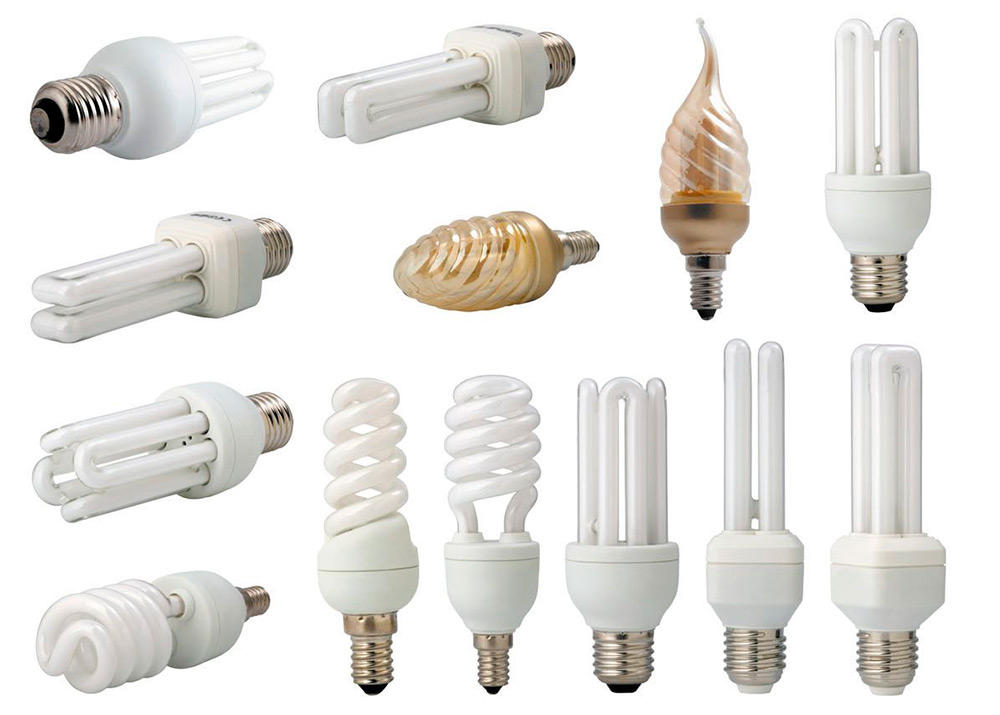
If you had an old energy-saving lamp lying around, electronic ballast it is working in it, then it’s quite simple to do it yourself a driver to power the LEDs. You have a question, and how to check the performance of the ballast? When disassembling the lamp, you need the lamp itself with a multimeter and, if at least one of them is burnt, then the probability is very high that the ballast is in working condition, and if both spirals are whole, then there is surely a malfunction in the ballast details and it needs to be fixed.
If everything is lying in a disassembled state, then you just need to very carefully examine all the details of the ballast and the track of the printed circuit board for damage. The fact that the details are dark do not pay attention, they just work in very harsh temperature conditions. If everything is in order, then you can begin to build the driver for the LEDs. It does not make sense to check all the details of the ballast, since you will spend a lot of time on watering and checking the parts. It will be much faster to assemble a circuit to power the LEDs from an energy-saving lamp and use it to test the performance of the ballast.
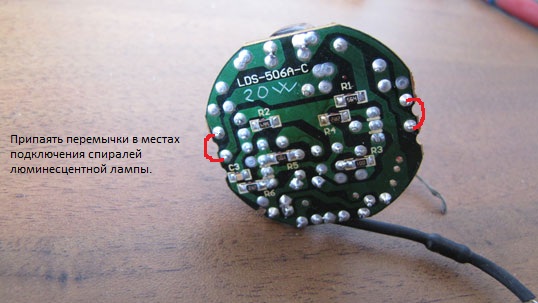
You need to start with soldering jumpers from the wiring, as in the photo and watering the throttle. On the choke you need to wind additional winding of copper wire.
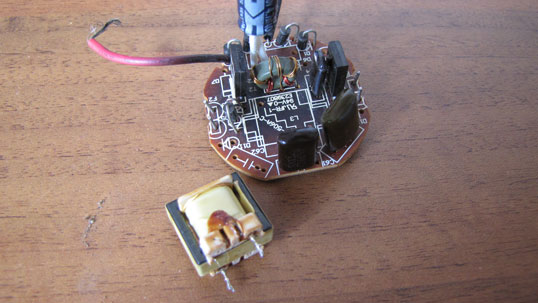
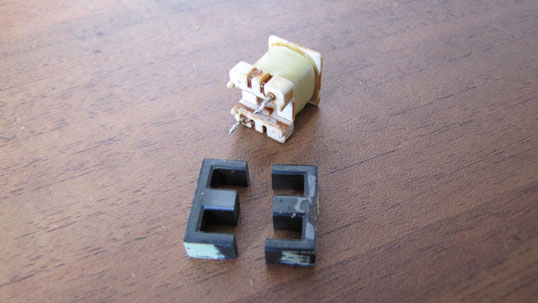
After you have dropped the choke, you need to disassemble it (disconnect the magnetic core) in order to easily wind the wire. First of all, carefully remove the adhesive tape from the surface of the magnetic circuit and debug it to the side, as we still need it for reassembly. Carefully try to separate the halves of the magnetic core with your hands (it is very fragile and breaks easily, so do not make much effort). If it does not work, then we inspect all the surfaces and, if there are streams of lacquer that have glued the magnetic circuit to the coil, then we cut and remove them with a simple clerical knife. Failed to disconnect? No problem. Then we heat the magnetic core in the joints with a soldering iron, a building hair dryer or a simple lighter (only be careful, do not damage the wound wire). When heated, the varnish softens and it will be easier to separate the magnetic core. It will turn out necessarily.
Next to the coil you need to lay a layer of electrical insulation. The wire that is wound on the coil works under the voltage of the network and, if you do not isolate it from the future winding, then the probability of penetration of the network voltage into the power supply circuit of the LEDs is high, which is a threat to your life. Insulation can be taken from old chokes, transformers, inductors, as well as wire for winding additional winding. You can even use paper.
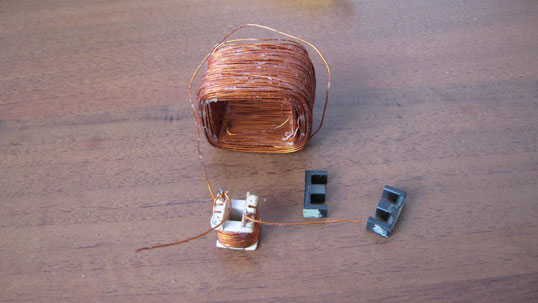
We wind additional winding. The diameter of the winding wire must be selected based on the number of turns needed to obtain the required voltage and free window in the magnetic core. The diameter of the wire needed the maximum possible (which fit). The thicker the wire, the more power you can get. I have LED assemblies 24-36 volts at a current of 280-300 milliamperes and I wound 30 turns of a wire with a diameter of 0.35. Got barely with tight winding, and the voltage was 28 volts. Approximately 1 volt per turn.

We collect the choke and solder it in place. To power the LEDs need a constant current, and we get a pulse. So you need a rectifier and if you do not want to collect it, you can take it ready, for example from an old power supply unit, like mine. I draw your attention to the fact that the resulting power supply without load, in this case, the LED can not be turned on, will burn.
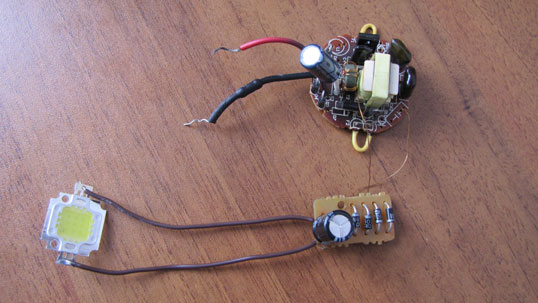
The circuit is assembled and it remains only to experience.
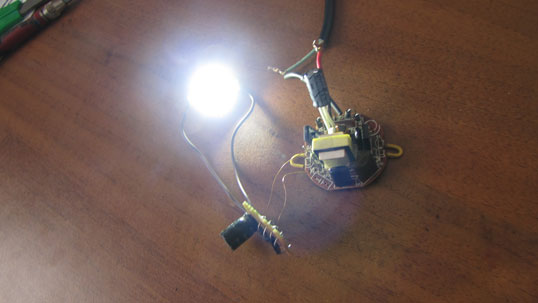
When measuring the LED current, it turned out 290 milliamps at a voltage of 26 volts. Perfect. But the transistors in the ballast are heated. Certainly not scary (they are familiar to this), but it is better to replace them with more powerful ones or put them on radiators if the LED will work in a long mode. I hope now you will be able to make the power supply of energy-saving lamps for the LED. The resulting device can be used to convert old lamps to LED, if everything is done carefully. I specifically did everything roughly for clarity and speed of execution.
Good luck to you.
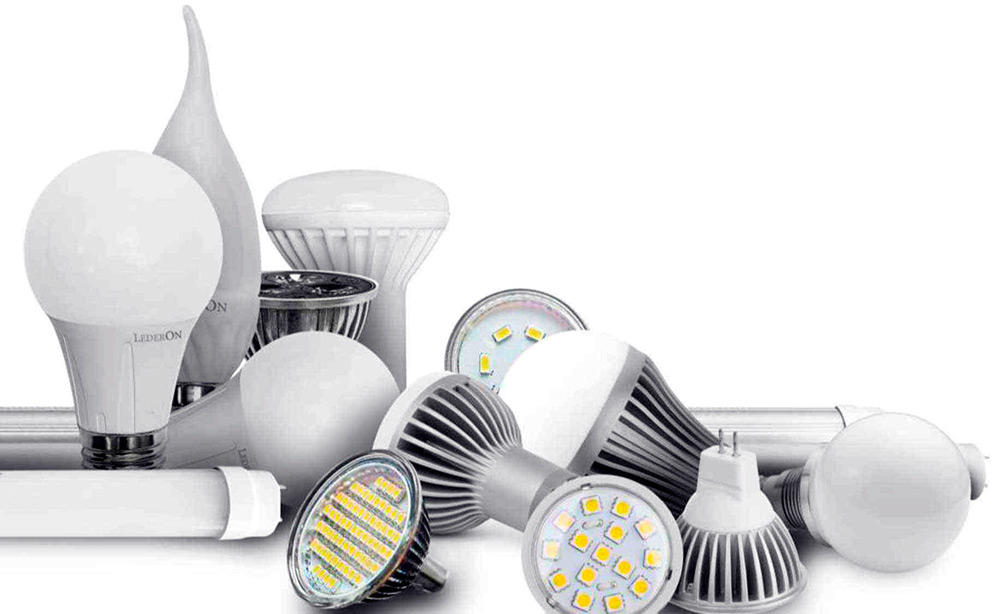
With the development of new technologies on the shelves of special stores, a lot of lighting devices have appeared, each of which has individual characteristics of brightness, economy and comfort for the eyes.
Production of LED lamps from energy-saving without soldering
For many years, manufacturers of LED lamps have tried to design a device that is similar in its properties to an ordinary incandescent lamp, plus a low power consumption, low heat generation and influence on others. As a result, light bulbs were presented to consumers.
Experts advise to give preference to the latest models, explaining the choice of a number of obvious advantages. The task is complicated for those who want to learn how to convert an energy-saving device into a LED with their own hands.
The main differences
LED lamp One way or another, the room provides brighter illumination. At a voltage of 13 W, it produces 1000 lm, energy saving - only 800 lm.
With regard to heat transfer, it is determined by the indicators of maintaining the optimum temperature in the building, maintaining in a suitable state household appliances and furniture. And here, too, the LED product is leading, with a heat transfer of 30.5 degrees with a heat transfer of an energy-saving device of 81.7 degrees.
The last product is designed for 8,000 hours of active work, whereas for the first one a record operating life is set - up to 50,000 hours. And over time, the LED lamp does not lose the original shade of illumination and brightness, which cannot be said about energy saving.
Laurels of superiority are given to LED sources and in the process of recycling, they can be thrown into the trash. thrown into landfill pollutes the environment (air and groundwater) with poisonous mercury vapor, resulting in the strongest poisoning of people, animals and fish. That is why it should take place in accordance with certain rules.
Despite the pros and cons, LED and are interchangeable - the manufacturers are worried about the appropriate size of any of the lamps, and cartridges for them.
Common to the two competing analogues is a fairly high-quality color flow, providing a high level of comfort for the retina of the human eye.
How to make a LED lamp
Necessary materials
In order to convert an energy-saving light bulb into an LED lamp with your own hands, you need to have the following list of materials with you:
- Burnt, broken lamp.
- A small piece of fiberglass to connect the parts together. If there are other ideas (other than soldering), you can use your own to solve the question of how to fix the LEDs.
- A set of radio elements that correspond to a specific scheme, including LEDs. Experts advise to choose for the assembly of an LED light bulb with their own hands the usual parts, which are presented in a large assortment on each radio market, where their cost is much lower.
- A capacitor with a volume of 0.022 Mf, the voltage of which is 400 V, one resistance is calculated for 1 mΩ and a pair of resistances for 200 Ohms.
- LEDs - it is cheaper to evaporate in the right amount using tape.
Making the scheme
The process of creating a scheme with your own hands begins with cutting a circle from a PCB, the diameter of which is 30 mm. Next, apply on the circle track, doing a good job nail polish for painting. After covering one layer, set the part aside until it is completely dry.

At this time, you can do chemistry, namely, with your own hands to make a mass that dissolves copper. To do this, mix the blue sulphate and ordinary kitchen salt in a 1: 2 ratio. Be sure to add a small amount of warm water (but not hot!) And dip the resulting charge into the mixture. Within a day you will notice how the copper disappeared from the textolite circle, only the part that was treated with varnish remained.
At the final stage, soldering is performed. However, before proceeding to this phase, use a special solvent and get rid of the lacquer layer. Then pass through the existing tracks.
Take a millimeter drill and make holes in the fixing areas of the elements. Finally go to a full soldering circuit. If you are not new to working with a soldering iron and have certain skills, to create an LED light bulb with a voltage of 220 V with your own hands, more precisely, its driver's boards, you just need to allocate 30 free minutes.
The assembly process is indiscriminate. Saw the metal perimeter at the very end of the plastic. Pull out all the internal parts, leaving only the wires emanating from the base of the old lamp. Arm yourself with a soldering iron again and fix the board to these wires.
Fasten the circuit, equipped with LEDs, on the inner surface of the plastic. Turn on the lamp before final sticking; if it works, use a hot glue.
How to do without soldering
Some may not be satisfied with the soldering, in this case, as an alternative, the driver for the product is replaced with a full-fledged power supply unit designed for fixing and operating the LED strip. It is through the use of a whole piece of tape, and not its individual segments, that soldering and global alteration are not required.
What problems may arise? With the size of the power supply. Here you will need to either redo the wiring from A to Z (lighting of the building is reduced to one branch), or each lamp or a series of products to power another transformer. If the house is equipped with spotlights, you can isolate the very first from the circuit and place a power supply in front of it, then install homemade LED models of 12 V instead of 220 V lamps.
How to collect light bulbs
The assembly of lighting products with their own hands is carried out from plastic pipes cut into separate segments. The LED strip is fixed to the sides of the pipes with a soldering iron, be sure to check the parallel circuit. At the end of the bundle of wires, place two pins acting as a base.
If the lamps are equipped with a traditional lamp holder, the process is simplified many times - it is enough to modernize old energy-saving devices, and there is no need to use internal boards. As in the previous time, the sample is disassembled, and all the “insides”, except for the wires of the base, are removed. The cap from which the fluorescent tubes came out is closed with a cylinder made of plastic, on which sections of the LED strip are fixed. These tapes are connected to the wires from the base.
When connecting, consider the "+" and "-". Plus, it is desirable to solder to the bottom of the base. If the connection did not give results, you can resolve the problem by reconnecting the output of the power supply to the wires.
Conclusion
In any case, there are plenty of ways to switch to more economical lighting. The LED lamp, made on the basis of energy-saving, will help save your money, and the process will especially appeal to those who have developed technical thinking.
Many thanks to the manufacturers of modern energy-saving lamps. The quality of their products constantly makes the brains move and pushes for new technical solutions.
So this time we consider the topic of reworking a failed energy-saving lamp into an LED. Today we will go on a more traditional way using the driver for the LED, but ... The most interesting part of the rework is the LED itself.
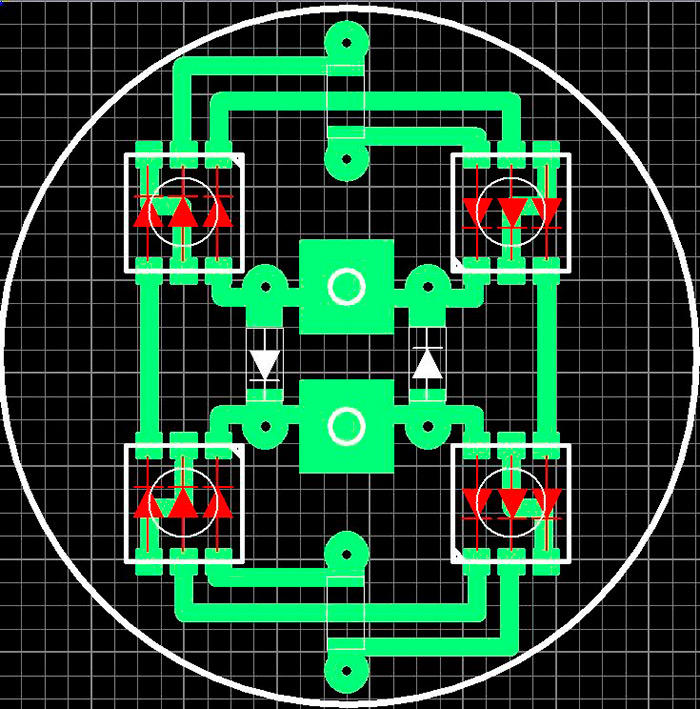
The other day, several samples of the Chinese electronics industry fell into my hands. These LEDs themselves are interesting, although they do not have outstanding characteristics. But one thing is that this LED provides a circular pattern, raises it to a whole new level and gives us a great tool for upgrading lighting systems.
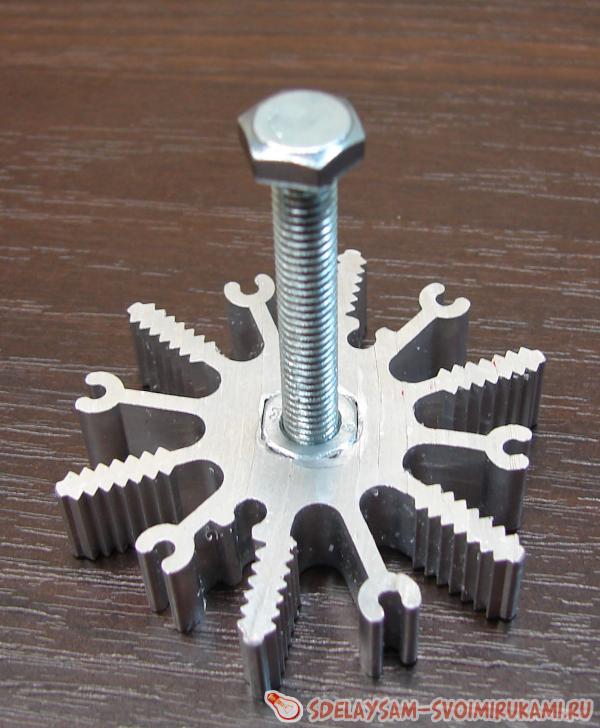
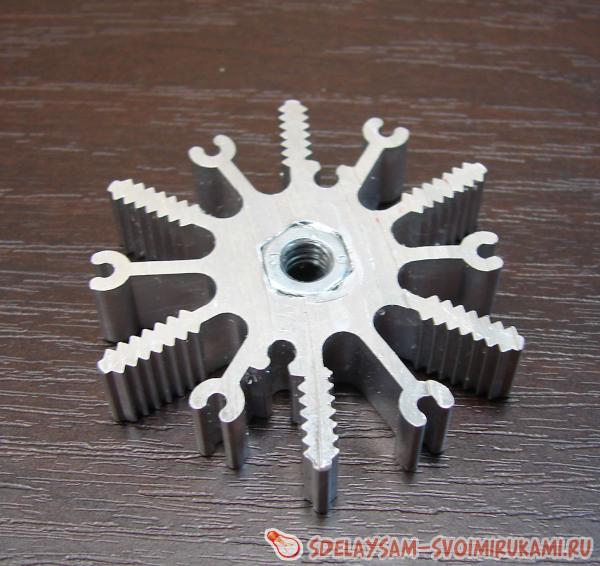
As a radiator, I used the AP888 aluminum profile, already known from the previous article, produced by Yug-Service LLC. Unfortunately, I only had a piece of thickness a little more than 10 mm. There was a fear that a 9 W power for the LED might not be enough. But the desire to conduct an experiment won.
A small disadvantage of this profile in relation to the new LED is the central hole with a diameter of 8 mm, and the thread of the “tail” of the M6 LED.
The easiest way out is:
- ream the hole to 10 mm;
- Screw the bolt into the M6 nut;
- gently, hitting the bolt head with a hammer, press the nut into the profile. The bolt is needed in order not to accidentally jam the threads in the nut.
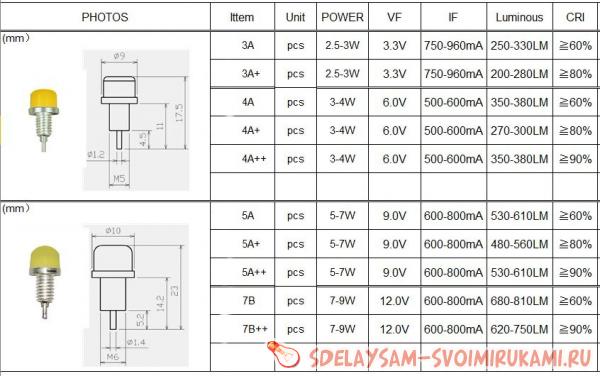
7V LED, power 7-9 W, 12 V, 600-800 mA. As a driver, I used the widely used 700 mA driver for three LEDs of the same Chinese production.
Further, as always, everything is simple. We can disassemble the energy-saving light bulb, the main thing is not to break the flask. And prepare the entire kit for assembly.
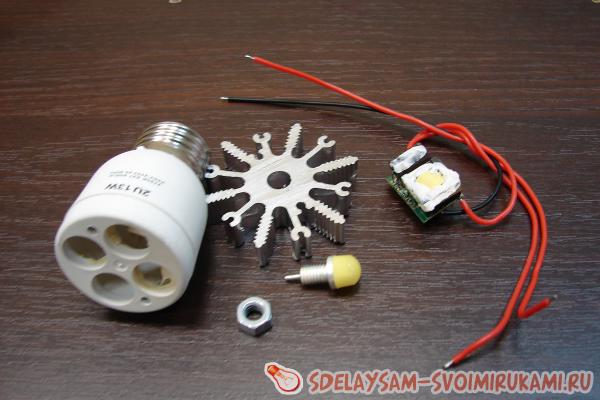
1. Drill holes in the cap of the base housing for mounting the radiator and wires.
Thematic materials:
Updated: 12/11/2017
103583
If you notice an error, select the text fragment and press Ctrl + Enter
You have a question, and how to check the performance of the ballast?Failed to disconnect?
What problems may arise?